
Hướng dẫn và ví dụ Flutter AppBar
Mục Lục
1- AppBar
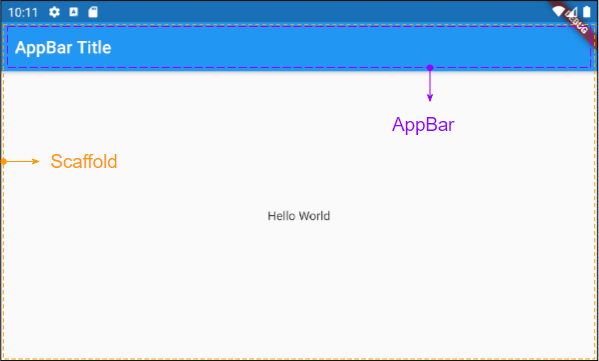
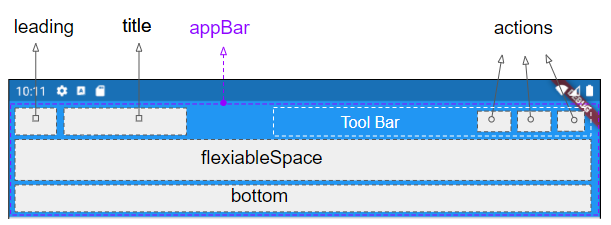
Trong Flutter, AppBar (Thanh ứng dụng) bao gồm một thanh công cụ (Tool Bar) và các Widget tiềm năng khác. Cụ thể, AppBar được chia làm 5 khu vực leading, title, Tool Bar (actions), flexiableSpace, bottom.

AppBar Constructor :
AppBar Constructor
Bạn đang đọc: Hướng dẫn và ví dụ Flutter AppBar
AppBar( {Key key,
    Widget leading,
    bool automaticallyImplyLeading: true,
    Widget title,
    List actions,
    Widget flexibleSpace,
    PreferredSizeWidget bottom,
    double elevation,
    Color shadowColor,
    ShapeBorder shape,
    Color backgroundColor,
    Brightness brightness,
    IconThemeData iconTheme,
    IconThemeData actionsIconTheme,
    TextTheme textTheme,
    bool primary: true,
    bool centerTitle,
    bool excludeHeaderSemantics: false,
    double titleSpacing: NavigationToolbar.kMiddleSpacing,
    double toolbarOpacity: 1.0,
    double bottomOpacity: 1.0,
    double toolbarHeight
  }
)
AppBar thường được đặt trong một Scaffold (Khung) thông qua property Scaffold.appBar. AppBar sẽ có chiều cao cố định và xuất hiện phía trên (top) của Scaffbar. Nếu bạn muốn có một thanh ứng dụng có thể cuộn hãy sử dụng SliverAppBar.
2- title
Widget title;
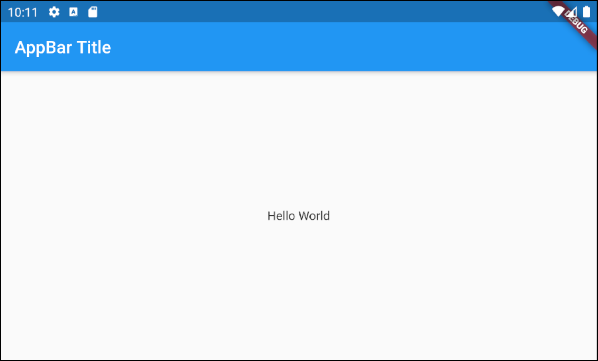
Ví dụ một AppBar đơn giản chỉ bao gồm một tiêu đề, và được đặt trong một Scaffold. Nó sẽ xuất hiện phía trên (top) của Scaffold.
main.dart ( title ex1 )
import 'package:flutter/material.dart';

void main() {
  runApp(MyApp());
}

class MyApp extends StatelessWidget {
  // This widget is the root of your application.
  @override
  Widget build(BuildContext context) {
    return MaterialApp(
      title: 'Title of Application',
      theme: ThemeData(
        primarySwatch: Colors.blue,
        visualDensity: VisualDensity.adaptivePlatformDensity,
      ),
      home: MyHomePage(),
    );
  }
}

class MyHomePage extends StatelessWidget {
  MyHomePage({Key key}) : super(key: key);

  @override
  Widget build(BuildContext context) {
    return Scaffold(
      appBar: AppBar(
        title: Text("AppBar Title"),
      ),
      body: Center(
          child:  Text(
            'Hello World',
          )
      ),
    );
  }
}
Ví dụ một AppBar với tiêu đề được căn giữa hoặc căn phải:

AppBar(
    title: Align (
        child: Text("AppBar Centered Title"),
        alignment: Alignment.center
    )
);

AppBar(
    title: Align (
        child: Text("AppBar Right Title"),
        alignment: Alignment.centerRight
    )
);

AppBar(
    title:  Text("AppBar Centered Title"),
    centerTitle: true,
);
Ví dụ tạo một “Title Widget” bao gồm các biểu tượng (icon) và văn bản.

main.dart ( title ex3 )
import 'package:flutter/material.dart';

void main() {
  runApp(MyApp());
}

class MyApp extends StatelessWidget {

  @override
  Widget build(BuildContext context) {
    return MaterialApp(
      title: 'Title of Application',
      theme: ThemeData(
        primarySwatch: Colors.blue,
        visualDensity: VisualDensity.adaptivePlatformDensity,
      ),
      home: MyHomePage(),
    );
  }
}

class MyHomePage extends StatelessWidget {
  MyHomePage({Key key}) : super(key: key);

  @override
  Widget build(BuildContext context) {
    return Scaffold(
      appBar: AppBar(
          title: IconTitleWidget()
      ),
      body: Center(
          child: Text(
            'Flutter AppBar Tutorial',
          )
      ),
    );
  }
}

class IconTitleWidget extends StatelessWidget {

  @override
  Widget build(BuildContext context) {
    imageCache.clear();
    return Row (
      mainAxisAlignment: MainAxisAlignment.center, // Centers horizontally
      crossAxisAlignment: CrossAxisAlignment.center, // Centers vertically
      children: [
        Icon(Icons.train),
        Icon(Icons.place),
        // The SizedBox provides an immediate spacing between the widgets
        SizedBox (
          width: 3,
        ),
        Text(
          "Place",
        )
      ],
    );
  }
}
3- leading
leading là một Widget được đặt phía trước vùng title, thông thường nó là một Icon hoặc IconButton.
Widget leading;
Ví dụ: leading là một IconButton, khi người dùng nhấp vào IconButton một hành động nào đó sẽ được thực thi.
// Example: leading is an IconButton
appBar: AppBar(
    title: Text("AppBar Title"),
    leading: IconButton(
        icon: Icon(Icons.notifications_active),
        onPressed: () {
             // Do something.
        }
    )
)

// Example: leading is an Icon
appBar: AppBar(
    title: Text("AppBar Title"),
    leading: Icon(Icons.notifications_active)
)

main.dart ( leading ex1 )
import 'package:flutter/material.dart';

void main() {
  runApp(MyApp());
}

class MyApp extends StatelessWidget {
  // This widget is the root of your application.
  @override
  Widget build(BuildContext context) {
    return MaterialApp(
      title: 'Title of Application',
      theme: ThemeData(
        primarySwatch: Colors.blue,
        visualDensity: VisualDensity.adaptivePlatformDensity,
      ),
      home: MyHomePage(),
    );
  }
}

class MyHomePage extends StatelessWidget {
  MyHomePage({Key key}) : super(key: key);

  @override
  Widget build(BuildContext context) {
    return Scaffold(
      appBar: AppBar(
          title: Text("AppBar Title"),
          leading: IconButton(
              icon: Icon(Icons.notifications_active),
              onPressed: () {
                showAlert(context);
              }
          )
      ),
      body: Center(
          child:  Text("Hello World.")
      ),
    );
  }

  void showAlert(BuildContext context) {
    showDialog(
        context: context,
        builder: (context) => AlertDialog(
          content: Text("Hi"),
        ));
  }
}
Ví dụ :
main.dart (leading ex2)
Xem thêm: Đặt tên miền Blog cá nhân như thế nào?
import 'package:flutter/material.dart';

void main() {
  runApp(MyApp());
}

class MyApp extends StatelessWidget {
  // This widget is the root of your application.
  @override
  Widget build(BuildContext context) {
    return MaterialApp(
      title: 'Title of Application',
      theme: ThemeData(
        primarySwatch: Colors.blue,
        visualDensity: VisualDensity.adaptivePlatformDensity,
      ),
      home: MyHomePage(),
    );
  }
}

class MyHomePage extends StatelessWidget {
  MyHomePage({Key key}) : super(key: key);

  @override
  Widget build(BuildContext context) {
    return Scaffold(
      appBar: AppBar(
          title: Text("AppBar Title"),
          leading: MyVolumeButton()
      ),
      body: Center(
          child:  Text("Hello World.")
      ),
    );
  }

}

class MyVolumeButton extends StatefulWidget {
  MyVolumeButton({Key key}) : super(key: key);

  @override
  State createState() {
    return MyVolumeButtonState();
  }
}

class MyVolumeButtonState extends State {
  bool volumeOn = true;

  @override
  Widget build(BuildContext context) {
    return IconButton(
        icon: this.volumeOn? Icon(Icons.volume_up):Icon(Icons.volume_mute),
        onPressed: () {
          // Set new State
          setState(() => this.volumeOn = !this.volumeOn);
        }
    );
  }
}
4- automaticallyImplyLeading
bool automaticallyImplyLeading: true
automaticallyImplyLeading là một property tùy chọn của AppBar, nó có giá trị mặc định là true. Khi bạn không đặt bất kỳ một Widget nào vào vùng leading, thì một Widget phù hợp có thể sẽ được tự động đặt vào đó, tùy theo ngữ cảnh.
Trương hợp 1: Một IconButton tự động được thêm vào vùng leading của AppBar để hỗ trợ mở ra một Drawer (Ngăn kéo) nếu các điều kiện sau đúng:
- Vùng leading của AppBar rỗng.
- AppBar. automaticallyImplyLeading : true.
- AppBar được đặt trong một Scaffold.
- Scaffold có chứa một Drawer (Scaffold.drawer được chỉ định).
Trường hợp 2: Một IconButton – “BACK” sẽ tự động được thêm vào vùng leading của một AppBar để hỗ trợ bạn quay lại màn hình trước đó nếu các điều kiện sau đây đúng:
- Vùng leading của AppBar rỗng.
- AppBar. automaticallyImplyLeading : true.
- AppBar.drawer : null
- Bạn đã nhẩy tới màn hình (screen) hiện tại từ một màn hình trước đó.

main.dart ( automaticallyImplyLeading : true )
import 'package:flutter/material.dart';

void main() {
  runApp(MyApp());
}

class MyApp extends StatelessWidget {
  // This widget is the root of your application.
  @override
  Widget build(BuildContext context) {
    return MaterialApp(
      title: 'Title of Application',
      theme: ThemeData(
        primarySwatch: Colors.blue,
        visualDensity: VisualDensity.adaptivePlatformDensity,
      ),
      home: MyHomePage(),
    );
  }
}

class MyHomePage extends StatelessWidget {
  MyHomePage({Key key}) : super(key: key);

  @override
  Widget build(BuildContext context) {
    return Scaffold(
      // AppBar with automaticallyImplyLeading = "true" (Default)
      appBar: AppBar(
          title: Text("AppBar Title"),
          automaticallyImplyLeading: true
      ),
      body: Center(
          child:  Text("Hello World.")
      ),
      drawer: Drawer(
        child: ListView(
          children: const  [
            DrawerHeader(
              decoration: BoxDecoration(
                color: Colors.green,
              ),
              child: Text(
                'My Drawer',
                style: TextStyle(
                  color: Colors.green,
                  fontSize: 24,
                ),
              ),
            ),
            ListTile(
              title: Text('Gallery'),
            ),
            ListTile(
              title: Text('Slideshow'),
            ),
          ],
        ),
      ),
    );
  }
}
5- actions
Property actions cho phép bạn thêm các action (hành động) vào thanh công cụ (Tool bar) của AppBar. Thông thường IconButton sẽ được sử dụng cho mỗi action thông dụng, với action ít thông dụng hơn bạn hãy cân nhắc sử dụng PopupMenuButton.
List actions

Ví dụ thêm các action vào thanh công cụ của AppBar.
main.dart ( actions ex1 )
import 'package:flutter/material.dart';

void main() {
  runApp(MyApp());
}

class MyApp extends StatelessWidget {

  @override
  Widget build(BuildContext context) {
    return MaterialApp(
      title: 'Title of Application',
      theme: ThemeData(
        primarySwatch: Colors.blue,
        visualDensity: VisualDensity.adaptivePlatformDensity,
      ),
      home: MyHomePage(),
    );
  }
}

class MyHomePage extends StatelessWidget {
  MyHomePage({Key key}) : super(key: key);

  @override
  Widget build(BuildContext context) {
    return Scaffold(
      appBar: AppBar(
          title: Text("AppBar Title"),
          actions:  [
            IconButton(
              icon: Icon(Icons.file_upload),
              onPressed: () => {
                print("Click on upload button")
              },
            ),
            IconButton(
                icon: Icon(Icons.settings),
                onPressed: () => {
                  print("Click on settings button")
                }
            ),
            PopupMenuButton(
              icon: Icon(Icons.share),
              itemBuilder: (context) => [
                PopupMenuItem(
                  value: 1,
                  child: Text("Facebook"),

                ),
                PopupMenuItem(
                  value: 2,
                  child: Text("Instagram"),
                ),
              ],
            )
          ]
      ),
      body: Center(
          child: Text(
            'Flutter AppBar Tutorial',
          )
      ),
    );
  }
}
Chú ý: Chiều cao của các action bị giới hạn bởi chiều cao của thanh công cụ (Tool Bar), tuy nhiên bạn có thể sét đặt chiều cao của thanh công cụ thông qua property toolbarHeight.
- TODO Link ?
6- bottom
Vùng bottom của AppBar thường được sử dụng để chứa một TabBar.
PreferredSizeWidget bottom;
main.dart ( bottom ex1 )
import 'package:flutter/material.dart';

void main() {
  runApp(MyApp());
}

class MyApp extends StatelessWidget {
  // This widget is the root of your application.
  @override
  Widget build(BuildContext context) {
    return MaterialApp(
      title: 'Title of Application',
      theme: ThemeData(
        primarySwatch: Colors.blue,
        visualDensity: VisualDensity.adaptivePlatformDensity,
      ),
      home: MyHomePage(),
    );
  }
}

class MyHomePage extends StatelessWidget {
  MyHomePage({Key key}) : super(key: key);

  @override
  Widget build(BuildContext context) {
    return DefaultTabController(
        length: 3,
        child: Scaffold(
          appBar: AppBar(
            bottom: TabBar(
              tabs: [
                Tab(icon: Icon(Icons.directions_car)),
                Tab(icon: Icon(Icons.directions_transit)),
                Tab(icon: Icon(Icons.directions_bike)),
              ],
            ),
            title: Text('Flutter AppBar Example'),
          ),
          body: TabBarView (
            children: [
              Center(child: Text("Car")),
              Center(child: Text("Transit")),
              Center(child: Text("Bike"))
            ],
          ),
        )
    );
  }
}
Source: https://evbn.org
Category : blog Leading


![Toni Kroos là ai? [ sự thật về tiểu sử đầy đủ Toni Kroos ]](https://evbn.org/wp-content/uploads/New-Project-6635-1671934592.jpg)


